Setting up ad tags from an ad network
Implementing ad tags process

Setting up ad tags for your website can be a scary thought at first. It is very easy for some publishers to stick to implement tags once and be hesitant to swap out new tags which could yield higher CPM’s from a more competitive network.
Step 1 – Ad Network contacts publisher
Generally if your site is large enough and has a good Alexa or SimilarWeb ranking, an ad network will contact you through your contact email or form on your site in hopes of becoming a monetization partner for your ad inventory.
Once an ad network contacts you they may ask some basic questions to set up a campaign such as how many impressions you have available, what ad server you use and what CPM they would need to pay you to buy your ad inventory
Step 2 – Sign the IO from the Ad Network
Most ad networks that work with publishers on a direct basis will require you sign an IO (Insertion Order), fill out a payment and tax forms. This is all standard operating procedure. Just make sure to read the IO carefully and make sure the deal you are signing off on has a favorable out clause and the fine print is understood in the terms and conditions.
Step 3 – Receive ad tags from Ad Network
Once all of the paperwork is taken care of the ad network will send you over the tags to implement. Usually the tags will come in a JavaScript format but iFrame are also common to reduce impression discrepancy. You should carefully review the tags to make sure all of the sizes you need are covered for each website you will be monetizing.
When you receive ad tags from any ad network it is important to scan the tags to make sure the creatives are appropriate and the ads are rendering correctly. To scan ad tags all you have to do is create a html file of the tags on notepad and refresh to see the ad stream. Usually at this time the ad network will issue you login credentials to track impressions that are accepted and revenue generated.
Step 4 – Implement ad tags
There are two main ways to implement ad tags. You can either place the ad tags in the ad server that you are using such as DFP or hardcode the ad tags directly onto your sites html. Once you have the tags implemented, monitor the UI closely to make sure you are generating the revenue you expect!
The most common and effective ad server for publishers is Google DFP. Here are the steps to implement ad network tags into DFP
- Create Ad Units
- Define Placements
- Create an order
- Upload ad creative
- Get the Ad Tags for your site
Step 5 – Monitor campaign performance
When setting any tag live from a network it is important to start analyzing the campaign performance, fill rate of impressions and quality of ads right off the bat. Track down to a granular level what eCPM you are generating for each country, placement and size and work closely with the ad network to maximize revenue. If you are lucky enough to have a dedicated account manager, keep regular communication that is clear, friendly, data driven to have a legendary campaign and deep relationship with the network.
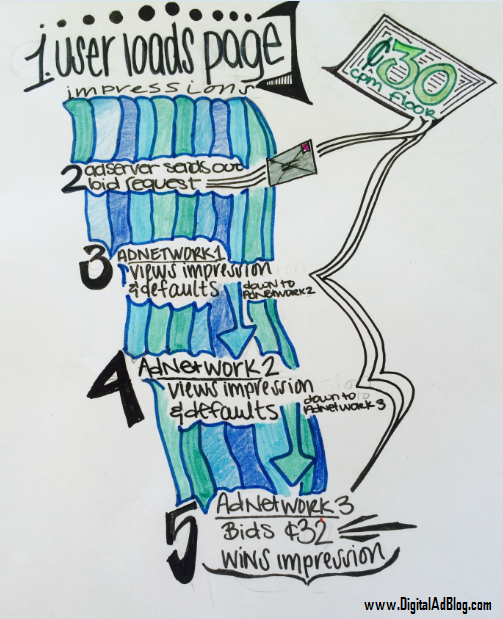
Using multiple ad networks to monetize your inventory has many benefits n this technology rooted industry. You are able to effective create your own mini bidding ecosystem to have thousands of advertisers bidding on every impression. The CPM Floor model is when a publishers has multiple ad networks bidding for every impression in real time, calling on the highest paying advertiser in each ad call.
CPM Floor or “Waterfall”= Multiple Ad Networks Competing